
Intro to the Seam Carving Algorithm
Oct 08 2020
This is an introductory tutorial to the seam carving algorithm, which I use in the next post to “improve” the way Twitter crops images. If you want to skip over the explanation and go straight to the application, click here.
For the last few weeks, I’ve been following along for an ongoing MIT class called “Introduction to Computational Thinking” after Grant Sanderson (of 3Blue1Brown fame) mentioned he was one of the lecturers. I’ve always been a huge fan of Grant’s work on 3Blue1Brown and thus far, the class, especially the lectures taught by Grant, has not disappointed. In one of the lectures, Grant introduced the concept of “seam carving,” which is an alternative way to crop images in confined spaces. I was fascinated by the approach, decided to play around with it a little myself, and wanted to share a brief introduction to the algorithm.
* * *
Images come in all shapes and sizes, and when we try to show these images, we are sometimes constrained. This leads us to the dilemma of figuring out how to maximize the amount of the image shown and if we can’t show the entire image, ideally show the most interesting parts.
For this walkthrough, let’s use the beautiful landscape image below (credit: Pietro De Grandi), which is a 3:2, meaning it is 50% wider than it is tall.

Now, imagine we want to show this image somewhere but we are constrained to a 3:4 space (33% taller than it is wide). Typically, we have two options: (a) show the entire image, but scale it to fit within the provided space; or (b) crop the image to fit height-wise while cutting off some portion from the sides. Neither of these approaches is optimal since we’re left with either a smaller image and wasted space above and below as we see in (a) or we have to cut parts of the image, potentially losing sections of importance, as we see in (b). At the moment, most social media companies opt to go down the cropping route, but as we’ll see in the next post, it can be very difficult for social media companies to accurately crop millions of images to really show the most interesting parts.
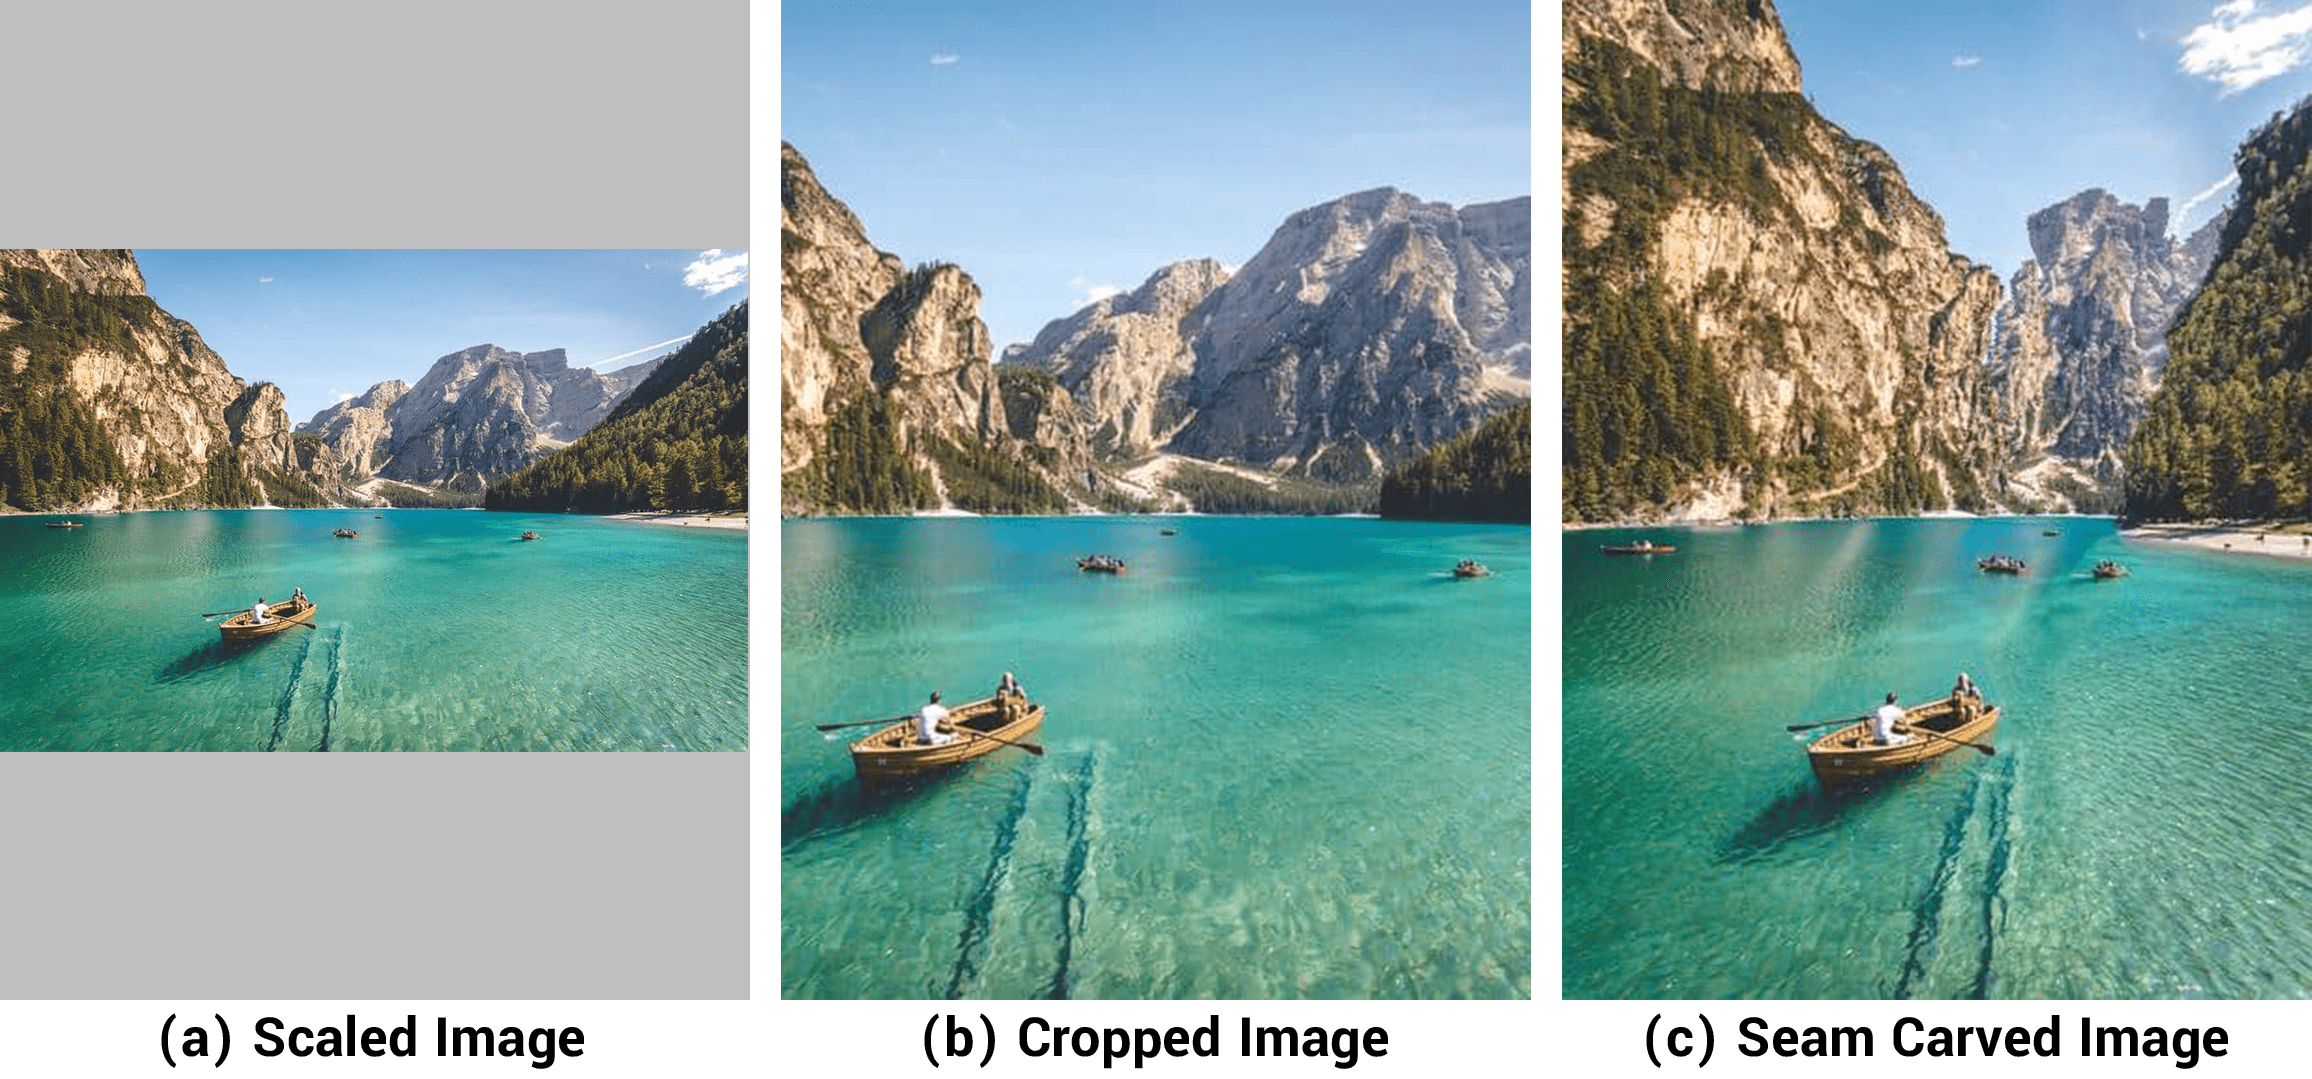
As an alternative, we can use the seam carving algorithm, which produces the image seen above on the right (c). When we use the seam carving algorithm on our image, we end up with something that shows all of the varied landscape that we see in the full image squeezed into the appropriately sized box. When compared to our other two approaches, seam carving seems like the obvious winner.
So what is actually happening to go from our full image to our squeezed final image? The seam carving algorithm works by repeatedly identifying a “seam” in our image that is the least “interesting” and then selectively slicing those seams out of the image. In this case, a “seam” is a continuous path that we draw from top-to-bottom (or left-to-right) of the image that does not loop or backtrack. If we identify a one-pixel seam in our image, we can remove each one of the seam’s pixels (one pixel per row) from the image, which will leave us with an image that is one pixel narrower. If we repeat this process 100 times, it’ll be 100px narrow. Thus, if we have an image that is 800px and we need it to be 600px, we simply need to identify and then delete 200 seams that represent the least interesting part of our image, leaving us with a 600px image of the good stuff.
A logical next question: how do we define the “least interesting” part of an image? This is obviously very subjective so there is no “right” way to do this. But one of the nice things about the seam carving algorithm is that we can pick any number of ways to define “interesting” depending on the context and the algorithm will still work. A very common way to do this is to use edge detection, which is what we’ll use here. The idea behind using edge detection is that edges generally indicate the presence of some object so a seam that passes through a number of edges is likely slicing through objects of importance, which is not ideal. Instead, we’ll want to identify seams that pass through as few edges as possible, which will hopefully skirt around any objects of interest. With that in mind, let’s use some edge detection on our image.
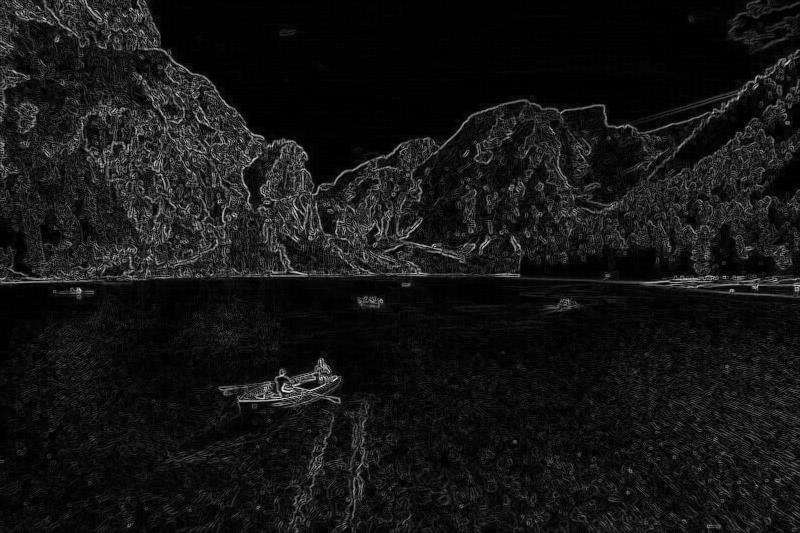
The above shows us where a computer detects edges in our image (see here if you’re interested in how we get such an image). We can see the outline of our boaters and our mountains but very few edges in our sky or water, which makes sense since these are both fairly uniform. So, now that we know where there are edges in our image, we will want to find a seam that slices through our image and minimizes the number of edges crossed. Doing this identifies the red seam we see below.

While this first red seam does slice through a number of edges to get from the top to the bottom, when we compare the seam’s path to our edge detection image, we can see that it traces through mostly uniform sections of the image. This means we probably won’t mind if we take a pixel or two from along this path. Most images will require any seam to cut through some edges, and depending on the image, this may work out totally fine. However, for some, carving out the “least interesting” part of the image may actually alter the image significantly, which is why seam carving, like any other cropping approach, should be used on a case-by-case basis to make sure it works appropriately in context. If you notice non-ideal results, it might be worth considering a different approach for defining “interesting” other than edge detection. That being said, this first identified seam seems (pun half-intended) to work pretty well for our landscape image.
So now that we’ve gone through the process for identifying one seam, all we have to do is carve out this identified seam and then repeat the process until we have an image of the intended size. The GIF below shows what this looks like as we squeeze the image to half its original width. Note that as we repeat the process, we are forced to carve out progressively more and more interesting seams, so it is important to find the right target size such that we don’t end up cutting out big chunks of important parts in the image. As you’ll notice, the seam carving algorithm has its constraints, but as do all other cropping approaches and algorithms in general. This will be but another tool in the image display toolbox.

So that’s seam carving! Pretty neat, right? While I don’t actually foresee this becoming the new standard for how we display images online, it is interesting to consider what it would look like if, for example, Twitter used a seam carving algorithm to render their image previews. Check out the next post to see what that actually looks like (preview: it works somewhat well for landscape photos and makes weird looking images for a lot of other things).
If you want to learn more about seam carving, I would highly recommend MIT/Grant’s original lecture. On the course website, they also have a live coding session showing the algorithm and a notebook (written in Julia) that you can use to play around with. I also put together my own Jupyter notebook (written in Python), which you can find in this Github repo. Huge shoutout to Karthik Karanth and his post on seam carving, which is where I lifted most of my python code.